Single Sign-On Guide for Okta
Marigold ID supports Security Assertion Markup Language (SAML) Single Sign-On. This functionality streamlines user access by requiring a single authentication with your company’s IdP, granting access to Marigold ID and Marigold products without the need to manage additional credentials.
As a Marigold customer, you can configure SSO with Okta as described below.
Okta IdP Mapping
If your company is using Okta Workforce Identity Cloud as your IdP, please follow the steps below to obtain the SAML certificate and metadata and pass them to your Marigold team.
-
Create a “Marigold ID” app with SAML 2.0 and configure the values as below:
-
Single sign-on URL: <any URL>
-
Audience URI (SP Entity ID) : <any URL>
-
Name ID format: EmailAddress
-
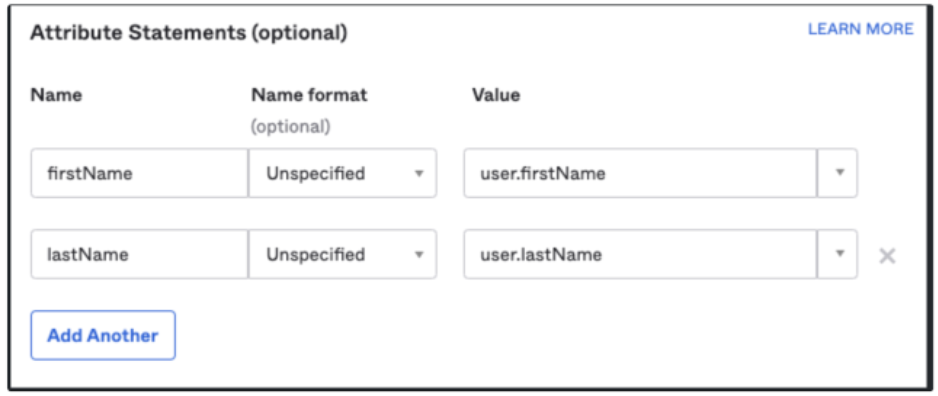
Attribute Statements (optional):
-
-
Download the SAML certificate and metadata and send them to your Marigold team.
-
Once Marigold’s IdP is configured, your Marigold team will provide the Okta IdP Metadata and the information below for configuring your Identity Provider to communicate with the Marigold ID application.
| Client IdP | Marigold Values |
|
Single sign-on URL |
Assertion Consumer URL |
|
Audience URI (SP Entity ID) |
Audience URL |
|
Default Relay State |
Default Relay State URL |
User Management
For organizations integrated with Marigold via Single Sign-On, all user management must be handled through your organization’s IdP. User accounts and access permissions should not be managed directly within the Marigold platform.
When a new user is provisioned in your IdP and assigned access to the Marigold application, the SSO integration will grant access based on the permissions defined in the mapped user groups.
Conversely, if a user is de-provisioned or removed from your IdP, the system will prevent them from accessing Marigold.
Please note that this approach represents a one-way user management flow. Your organization’s IdP acts as the single source of truth for managing user access to Marigold applications.
The platform supports two ways of assigning user access in Marigold ID:
-
Direct Assignment: Access is assigned at the individual user level (known as personal access).
-
User Group Assignment: Users are added to a user group that has predefined access. Any changes to the user group’s access will automatically apply to all users within that group.
Note: Both personal access and user group access can be assigned to a user simultaneously. The system will evaluate both and grant the user the highest level of access (i.e., the most privileged role) between the two.
If your organization has more than a handful of users (e.g., 10+), or you expect to scale access across departments or brands, utilizing user groups is the more efficient and scalable option.
Direct Assignment
Direct Assignment is ideal for assigning access to a small number of users without needing to configure or rely on user groups. This approach allows for customized permissions tailored to specific users based on their individual roles or responsibilities.
To add a user and grant them access to Marigold ID:
-
In Okta, select Persons from the left navigation bar, then click Add Person.
-
Enter the required user information and click Save.
-
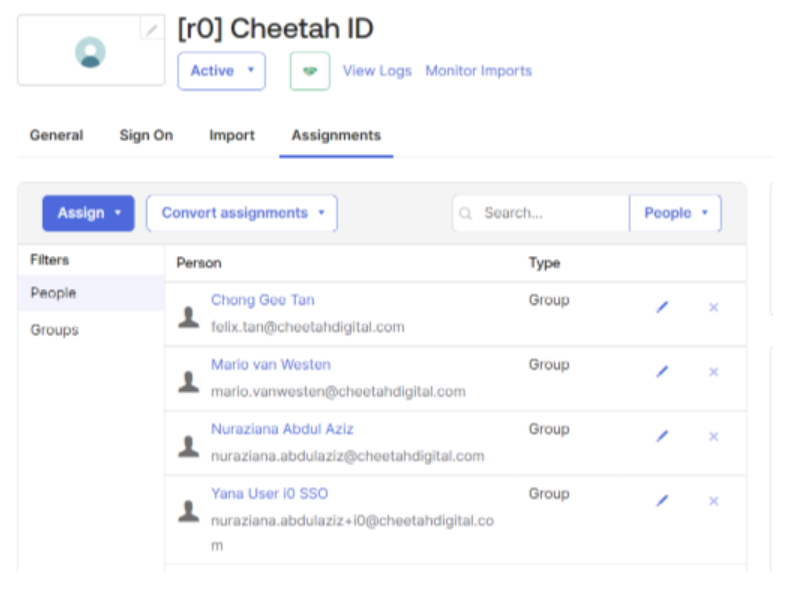
Select Applications from the left navigation panel.

-
Select the Marigold ID application configured previously for the SAML SSO integration. The Application page is displayed.
-
Select the Assignments tab.
-
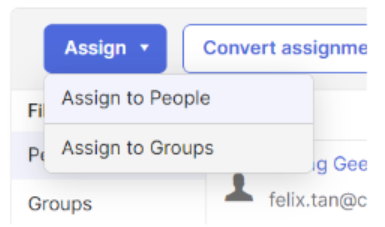
Click Assign, and select whether to assign users or groups into this application.
-
Search for the user or group to be assigned, and click Done.
-
Once the user is assigned to the group, the user can log in from Okta and they will see the Marigold ID application tile. The user can also use a vanity URL to log in (request this vanity URL from your Marigold team).
User Group Assignment
To enable SSO to access Marigold products using Marigold ID’s User Groups, please note the following:
| Existing Client | New Client |
|
If you are an existing Marigold client using Cheetah Digital, (Undefined variable: MyVariables.Product_Loyalty_Short), and/or Platform, before the migration: If you currently have an active SSO integration with a Marigold product, your Marigold team will export the list of existing users along with their current permissions. Please review the exported user access and inform the Marigold team of the User Groups and related access / permissions that need to be created. Please note the criteria for group name creation as below:
For example: org-admin-all-applications, standard-user, report-viewer Your Marigold team will set up these User Groups for your organization. You will then need to map them to the corresponding user groups in your Identity Provider to complete the SSO setup. |
If you are a new Marigold client, or if your company has not previously integrated SSO with any Marigold products, please inform your Marigold team of the User Groups and access levels that need to be created. Please note the criteria for group name creation as below:
For example: org-admin-all-applications, standard-user, report-viewer Your Marigold team will set up these User Groups for your organization. You will then need to map them to the corresponding user groups in your Identity Provider to complete the SSO setup. |
Configure Custom Groups in Okta
Once the User Groups are created by your Marigold team in Marigold ID, follow these steps to create the same groups in your organization’s Okta IdP.
-
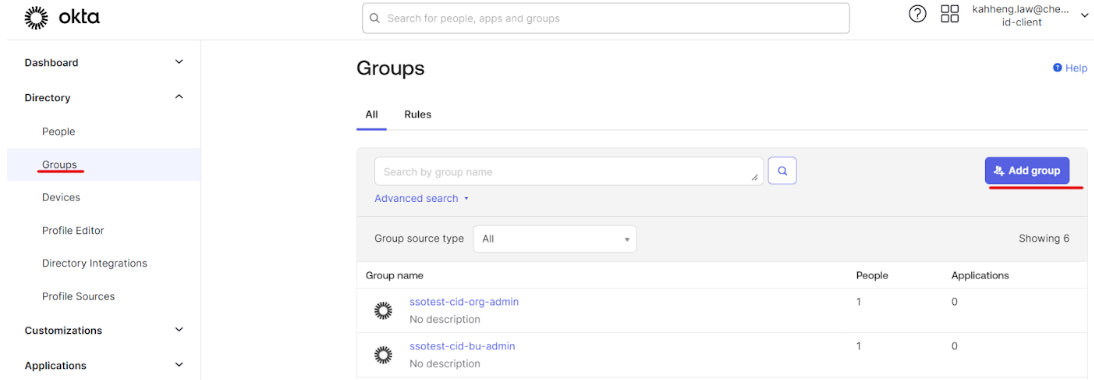
In Okta, navigate to Groups and click Add Group.
-
Enter a name for the new Group. Please note the following criteria for the Group name:
-
Lowercase
-
Replace spaces with dashes ("-")
-
For example: "ssotest-cid-org-admin."
-
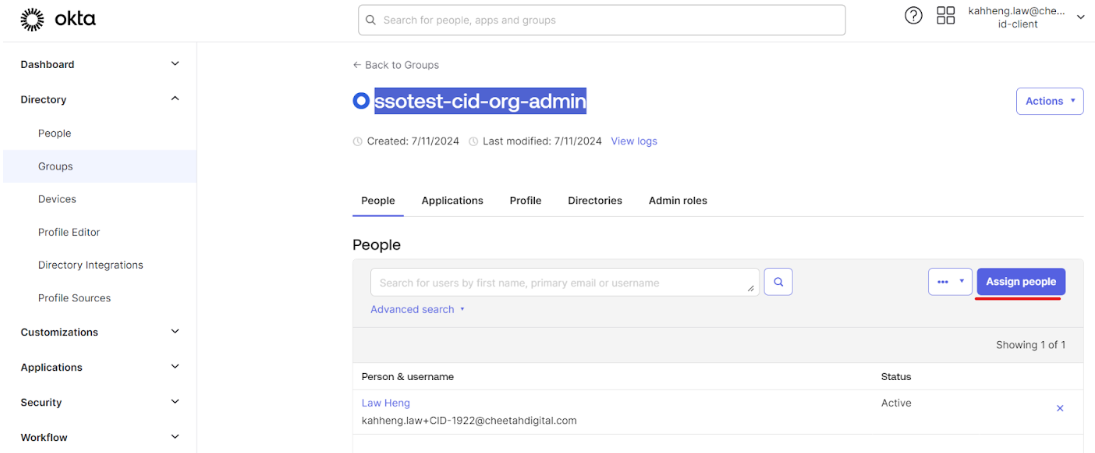
Click Assign People to assign a user to the group created above.
-
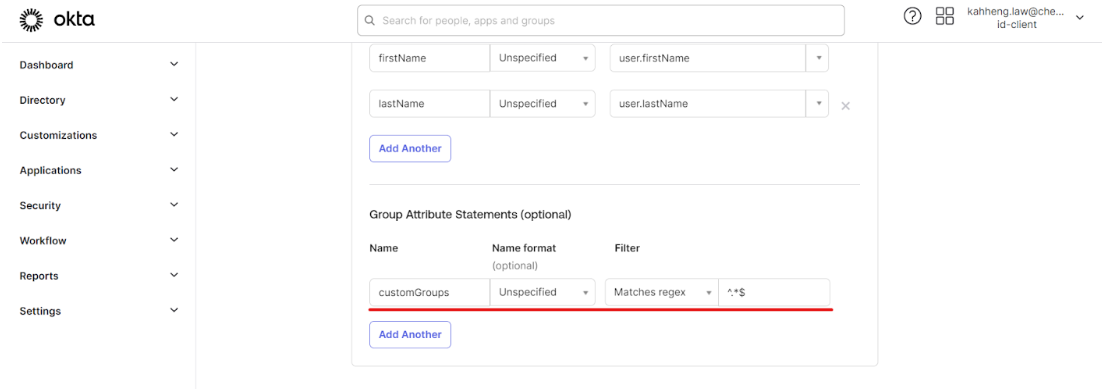
Create the customGroups claim in the Marigold ID SAML Application settings.
-
Enter the Claims Required (on top of existing group)
-
firstName: user.firstName
-
lastName: user.lastName
-
-
The CustomGroups Claims Requirements should conform to the following requirements:
-
Created under Group Attribute Statement
-
Filter: select Matches regex
-
Value should be ^.*$
-
Name should be customGroups
-
Configure and Maintain User Groups in Marigold ID
Once onboarded to Marigold ID, your Organization Administrator can access the Marigold ID Administration environment and verify the User Groups created by your Marigold team.
If you need to create additional User Groups within Marigold ID, please see Create a User Group for more information on this process. Please note the following when creating a User Group in Marigold ID:
-
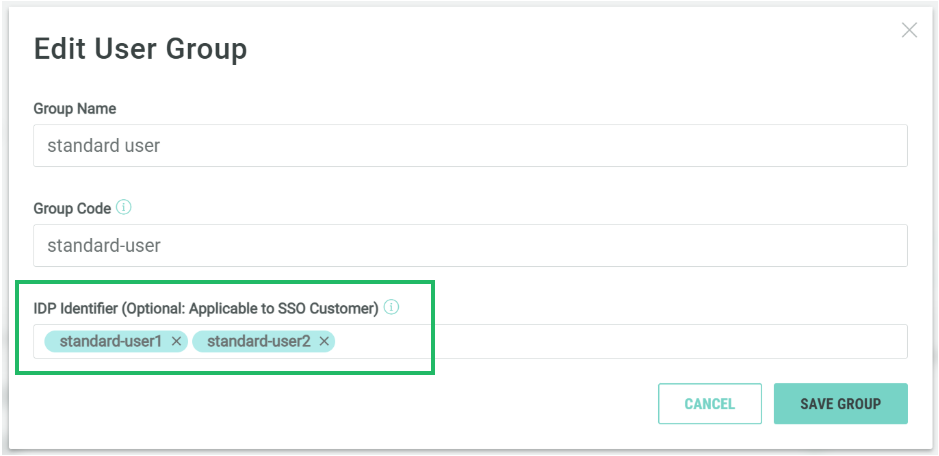
The Marigold ID Group Name field must match the Group name in your IdP.
-
Leave the IDP Identifier field empty.
For any new User Groups created, be sure to map them to your organization’s IdP groups. This mapping ensures that users can be assigned to the appropriate groups through your IdP.
Once you create and save a new User Group, any users add to the User Group will automatically be granted access to the Business Units and applications defined for that User Group.
IdP Identifier
By default, the IDP Identifier field is left empty; as a result, users can be mapped to this User Group only based on the Group code. Optionally, you can use the IDP Identifier field to associate multiple group names with a specific User Group for more flexible user mapping.
User Group Synchronization
The platform supports two options for synchronizing User Groups in Marigold ID with Groups in Okta. For information on these options, please see Manage SSO User Group Synchronization.
Application Specific User Group Mapping
For the Cheetah Digital, Marigold Grow, and (Undefined variable: MyVariables.Product_Loyalty_Full) applications, Marigold ID allows Organization Administrators to assign permissions specific to those applications.
For more information on integrating with Cheetah Digital, please see Map a User Group to an Engage+ Access Group.
Marigold ID integrates with Marigold Grow and (Undefined variable: MyVariables.Product_Loyalty_Full) using a feature called App Attributes. This option allows Organization Administrators to manually select the desired application-specific Role to which users in this User Group will be assigned, and also to customize the privileges granted to the user by that Role. See Configure Application Role for a User Group for more information.
